If you have a minor crack or hole in your ceiling, repairing it is generally cheaper than replacing the entire section. It also helps keep your home in good shape and may even prevent a more serious problem down the road.
Start by assessing the damage, gathering the necessary tools and materials, and patching the holes or cracks. Then, sand the surface to prepare it for priming and painting. Contact Ceiling Repair Perth now!
Over time, every home experiences wear and tear, including the ceiling. Problems can range from cracks to sagging, water damage and even mould. If these issues are left unattended for too long, it can lead to a number of costly repairs and may affect the overall value of your home. If you’re planning to sell your property in the future, it’s important to repair any problems with your home’s ceiling as soon as possible.
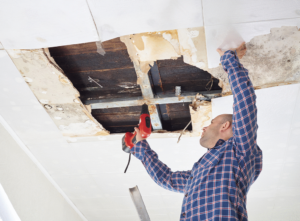
The first step in repairing your damaged ceiling is to assess the extent of the damage. This can help you determine whether the issue is cosmetic or structural. You’ll want to identify any water stains, discolouration and bubbling in order to determine the best approach. If the damage is widespread, you may need to remove sections of your ceiling to prevent further deterioration and potential collapse.
After assessing the damage, it’s important to dry out the affected area as quickly as possible. This will prevent further water damage and also help to stop the spread of mould. You can do this by turning off the power in the area, removing any items from the ceiling that have been affected and opening windows to improve ventilation. Using fans and dehumidifiers can also help to speed up the drying process.
Once the area is dry, you can start to repair any holes or cracks in your ceiling. This is a relatively straightforward task for DIYers, though it’s important to take care and use good technique. You’ll also need to ensure that you have all of the necessary tools before you begin. It’s also recommended that you wear a dust mask and eye protection while working on the ceiling, especially if there are any signs of major water damage.
When repairing cracks in your ceiling, you’ll need to apply a drywall patching compound or Spackle to the damaged areas. Once this has dried, you’ll need to sand it smooth and then repaint the area. Before painting, you should apply a stain-blocking primer to prevent any water stains from bleeding through. It’s also important that you choose a high-hiding ceiling paint in a neutral colour.
If you’re tackling ceiling repair, it’s important to have the proper tools and materials to get the job done. This includes a good quality brush, sandpaper and primer to ensure that your repaired surface looks professional. You should also have a variety of paint colors available to match your existing ceiling texture and color scheme.
Before starting any repairs, you should clear the area of furniture and cover surfaces to protect them from dust and paint splatters. If possible, removing or covering furniture can save time and money by reducing the amount of cleanup required afterward. You’ll also need to have a drop cloth or plastic sheeting handy to catch any drips and spills, which can quickly cause damage if not cleaned up promptly.
Once the ceiling is clean and dry, you’re ready to start repairing holes or cracks. A drywall patch kit is typically adequate for small holes or cracks in your home’s ceiling, and these kits are readily available from most home improvement stores. However, if the crack or hole is significant, you may need to hire an experienced contractor. Larger holes or cracks, especially those caused by water damage, can often require extensive repair and retexturing to avoid mold growth and other structural issues.
Likewise, if your ceiling is covered in popcorn texture, you’ll need to remove it before proceeding with any repair or painting. Popcorn texture can be difficult to remove and is more prone to cracking or mold growth than standard drywall. A professional will be able to use the correct removal methods and techniques for the most effective results.
Finally, be sure to select a high-quality primer that’s designed for use on drywall or ceilings. This will help seal the repaired area and prepare it for paint application. Follow the manufacturer’s recommendations for application and drying times.
As with any repair project, it’s essential to take your time and carefully assess the damage before beginning the work. Careful inspection and evaluation can prevent costly mistakes in the future, and it can even help you decide if repair or replacement is the best option for your ceiling.
If there are holes in your ceiling, these need to be patched to prevent water damage from seeping into other areas of the home. Large holes can also leave the underlying structure vulnerable to wood rot and mold, so it’s important to address them as soon as possible.
Before you begin repairing your ceiling, it’s a good idea to lay down a tarp or piece of plastic in the area where you will be working. This will help catch any falling debris and keep your furniture protected from paint or plaster dust. You’ll also want to set up a ladder that can reach the damaged area. If you’re a homeowner, this may mean using an A-frame ladder, while renters can probably get by with a step ladder that is sturdy enough to support you while you work.
Start by cleaning the area around the hole with a damp rag or cloth. This will remove any dirt or dust that could prevent the drywall tape from adhering properly to the ceiling. If there is any loose drywall, use a utility knife to pry it up. Make sure to wear a dust mask while doing so, as sanding drywall creates plenty of dust.
Next, prepare the area to be patched by applying a thin coat of joint compound, also known as drywall mud or spackle. This will help fill in the holes or cracks and ensure that the new drywall is strong.
Once the drywall compound has dried, you can apply a second coat and sand it smooth. You will likely need to sand a third time, or more, before the area is smooth and ready for painting.
If you’re dealing with a large crack in your ceiling, you may need to reinforce it. This is especially important if the crack extends past the edges of your home, as this can cause structural problems. If the crack is very wide, you can add extra support by applying mesh or paper drywall tape to the surface.
If you’re worried that your cracks will reappear, you can add an extra layer of protection by using a flexible product like Elastopatch. This can be applied with a brush directly over the crack, or it can be applied to areas that have been filled with compound or spackling. Once it dries, you can then sand it smooth and apply a coat of primer to finish the job.
As with walls, repairing cracks and holes in the ceiling can be a time-consuming job. Whether you choose to tackle the job yourself or hire a professional, it’s best to prepare the area by removing shelves and any hanging hardware like electrical outlets or light switches. You should also protect furniture with drop cloths and mask off mouldings, trim, windows and the ceiling.
If the cracks and holes are cosmetic and do not cause water damage or a structural issue, you can patch them yourself using drywall compound or spackle. You’ll want to wash the wall to remove any grease before applying the filler and sanding it down so that it is flush with the existing wall. Once you’re finished sanding, priming will seal the filler and keep it from coming off in the future.
When it comes to larger holes or sagging areas, you may need to replace the damaged drywall panel. If this is the case, you’ll need to clear the attic insulation and remove the old drywall before installing the new panel. Then, you’ll need to tape and mud the edges of the replacement to ensure that the seams and joints are watertight. Finally, you’ll need to sand the surface of the drywall to prep it for painting.
It’s important to prime any surface that you intend to paint, regardless of the color. Priming creates a surface that the paint can bond to, which will help ensure smooth and even coverage. It’s especially important to prime surfaces that have been coated with a glossy finish or those that were previously painted with oil-based paint.
If you don’t prime the wall before repainting it, you could end up with bleed through of the original color or a lighter shade. This can be especially noticeable if you’re changing from a dark color to a lighter one, as it can take multiple coats to achieve full and even coverage. In this case, it’s even more important to use a high-quality primer that provides good adhesion and stain blocking properties. This will ensure that the new paint won’t bleed through and ruin the appearance of your room.